249
248
ISTRUZIONI DI MONTAGGIO - INSTALLATION INSTRUCTIONS
INSTRUCTIONS D'INSTALLATION - INSTRUCCIONES DE MONTAJE
NOTA IMPORTANTE: per garantire un prodotto privo di
difetti, tutte le carte da parati PINTDECOR vengono sot-
toposte ad un rigido controllo qualità. Prima di procedere
alla posa della carta da parati, è necessario verificare in
ogni sua parte che non ci siano eventuali imperfezioni e
discordanze cromatiche. In particolare è fondamentale un
riscontro/ confronto tra i diversi teli che formano il disegno
ed il Render progettuale, comprensivo delle diverse quote,
inserito all’interno della scatola.
ATTENZIONE: non si accettano reclami dopo che la carta
da parati è stata già applicata alla parete.
NOTE IMPORTANTE: afin de garantir un produit sans
défaut, tous les papiers peints PINTDECOR sont soumis à
un contrôle strict de qualité.
Avant la pose du papier peint, il est nécessaire de bien
vérifier chaque partie afin d'exclure des imperfections et
des différences de couleur.
En particulier il est essentiel une comparaison entre les
différents lés du dessin et le visuel à l'intérieur du carton.
ATTENTION: aucun ultérieur litige ne sera accepté après la
pose du papier peint.
NOTA IMPORTANTE: para garantizar un producto sin
defectos, todos los papeles pintados PINTDECOR están
sujetos a un estricto control de calidad. Aun así, antes de
proceder con la instalación del papel pintado es necesa-
rio comprobar que el material no presente imperfecciones
ni discrepancias cromáticas. En particular, es imprescindi-
ble una comprobación/comparación entre las diferentes
láminas que componen el dibujo y el proyecto gráfico que
incluye todas las medidas y se encuentra en el interior de
la caja.
ATENCIÓN: no se aceptan reclamaciones después que el
papel pintado se haya aplicado a la pared.
IMPORTANT NOTE: in order to guarantee a defect-free
product, all PINTDECOR wallpapers undergo a strict quali-
ty control. Before the wallpaper installation, it is necessary
to check every part of it so that imperfections and color
discrepancies are excluded. In particular, it is essential a
comparison between the different wallpaper strips which
compose the image with the different sizes and the design
render inside the box.
WARNING: no complaints will be accepted after the
wallpaper has been installed.
UTENSILI UTILI
Secchio con acqua - Rullo in tessuto acrilico a pelo corto - Rullino premi giunte in materiale plastico
Cutter con lama da 18 mm. - Livella - Matita - Metro - Riga e Spatola da tappezziere
Tavolo da tappezziere - Panno o spugna morbida - Colla per parati
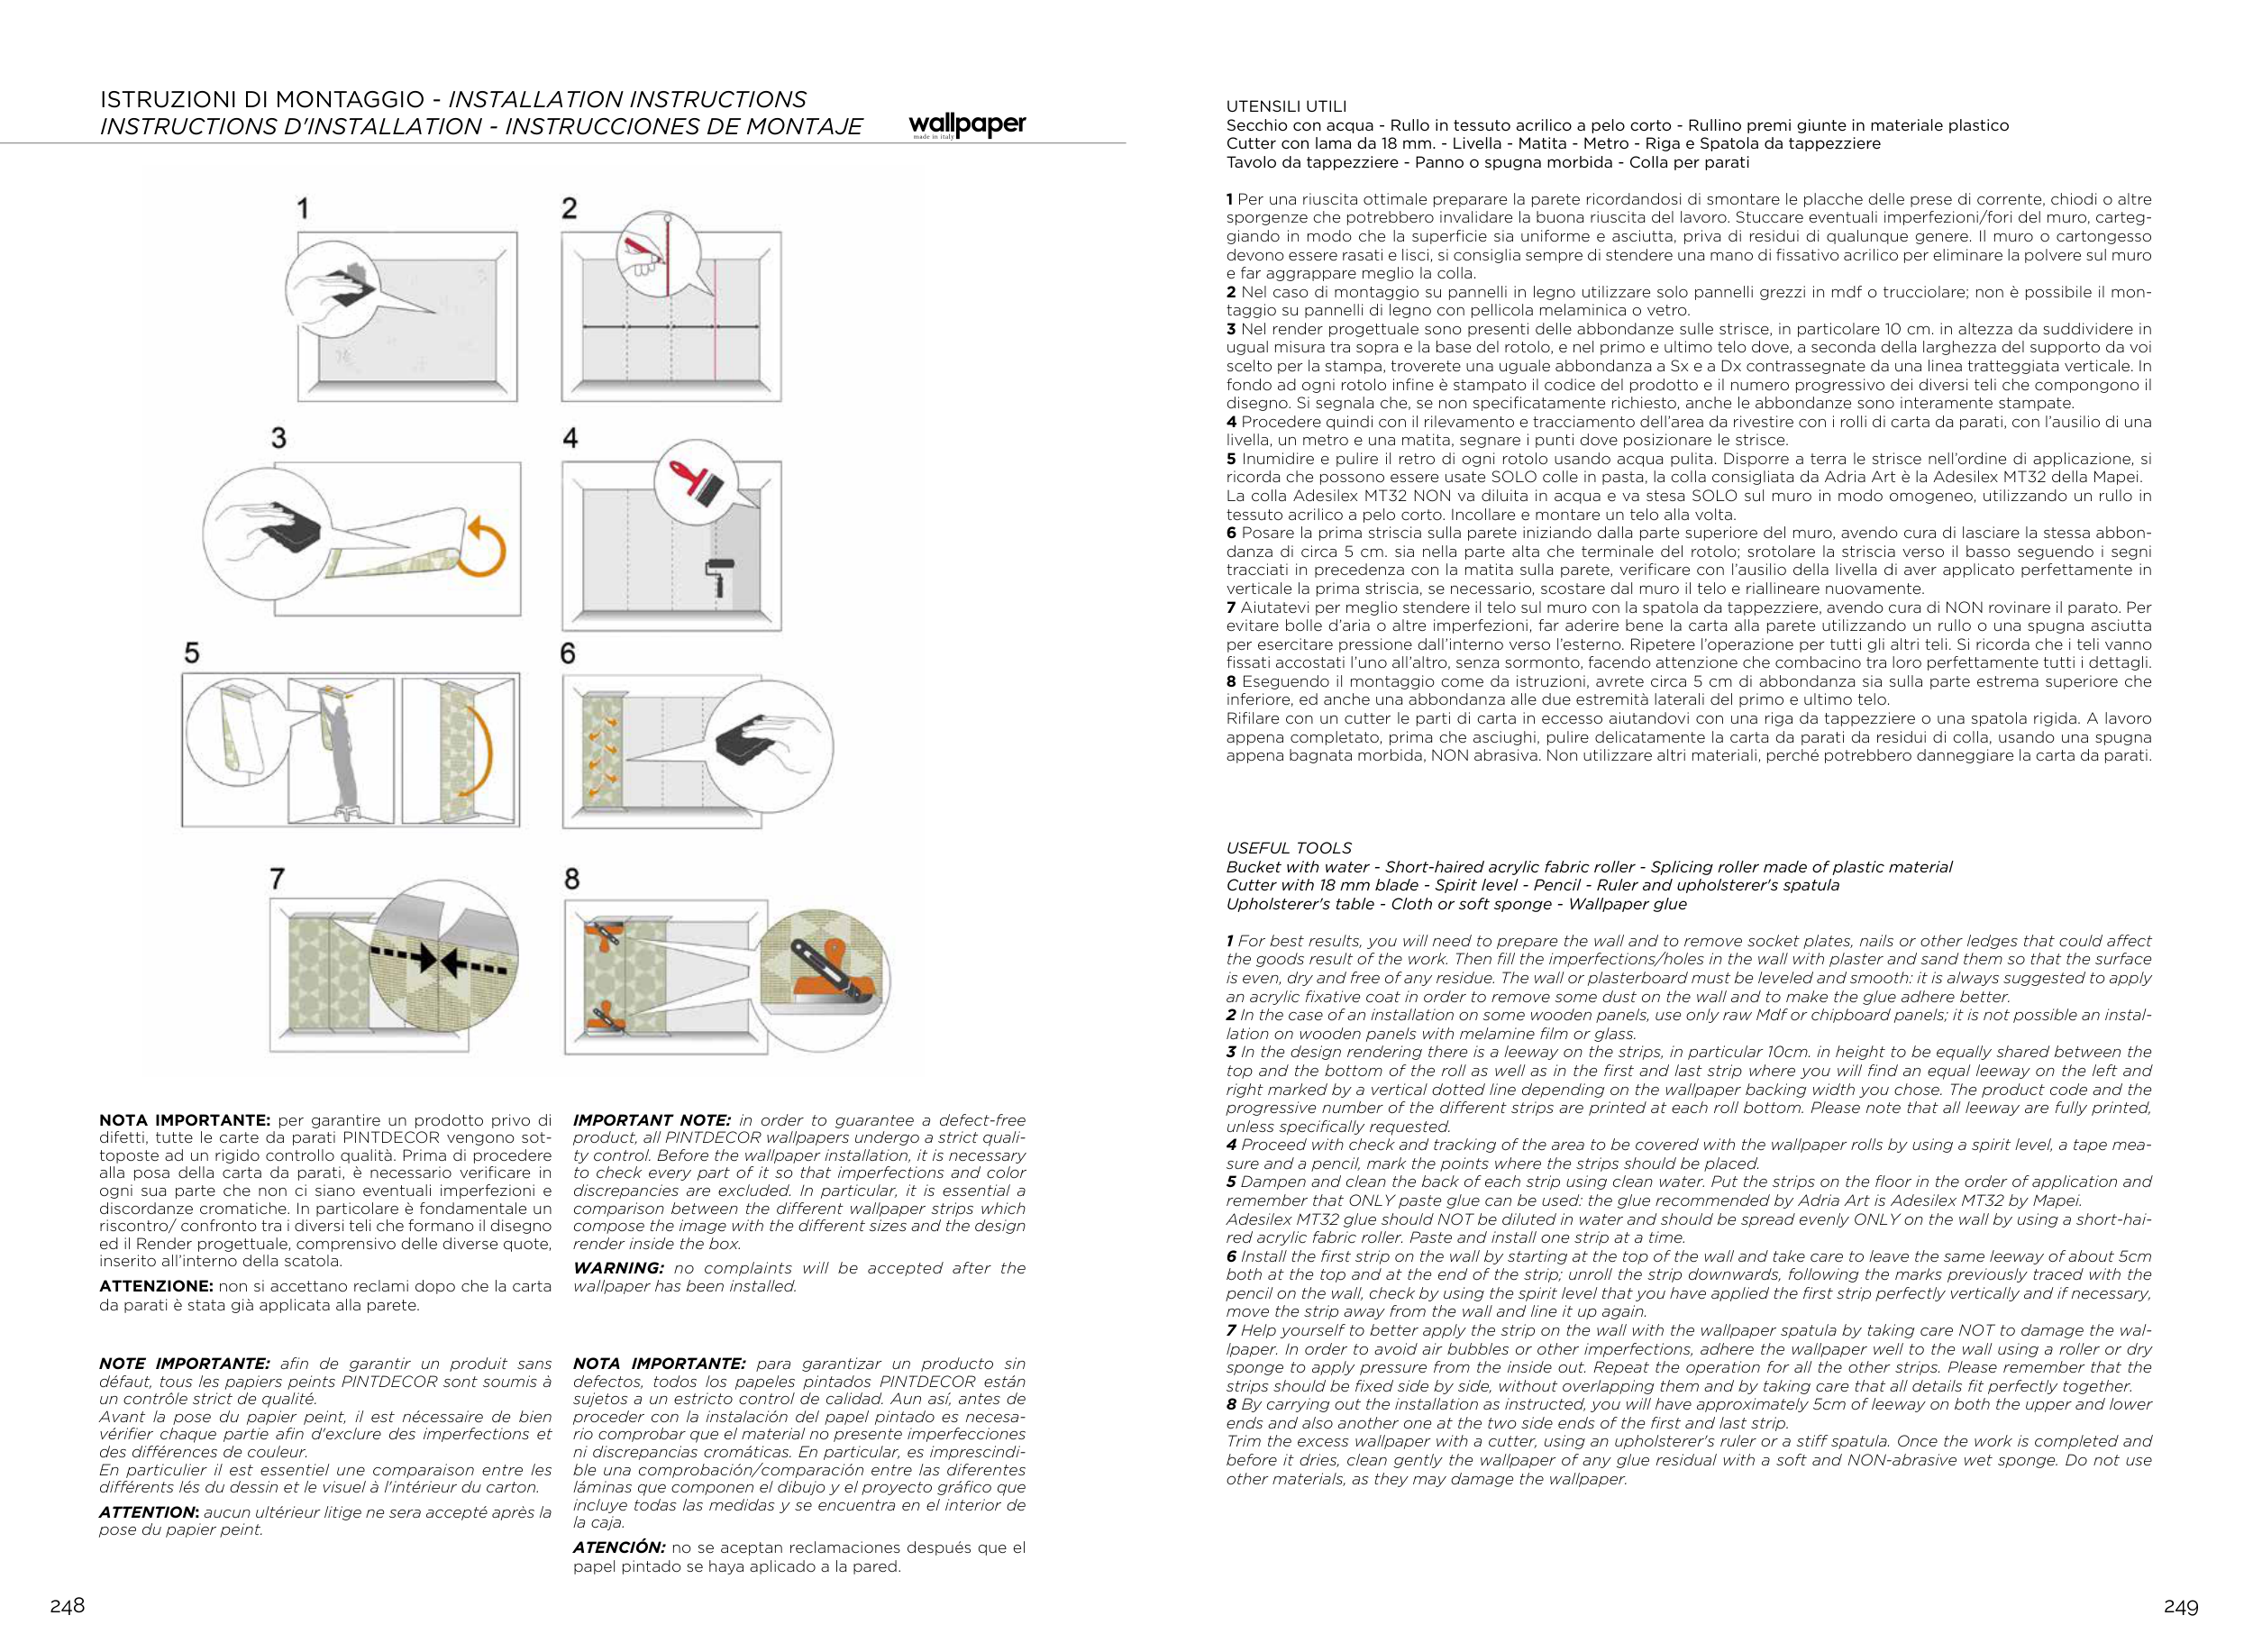
1 Per una riuscita ottimale preparare la parete ricordandosi di smontare le placche delle prese di corrente, chiodi o altre
sporgenze che potrebbero invalidare la buona riuscita del lavoro. Stuccare eventuali imperfezioni/fori del muro, carteg-
giando in modo che la superficie sia uniforme e asciutta, priva di residui di qualunque genere. Il muro o cartongesso
devono essere rasati e lisci, si consiglia sempre di stendere una mano di fissativo acrilico per eliminare la polvere sul muro
e far aggrappare meglio la colla.
2 Nel caso di montaggio su pannelli in legno utilizzare solo pannelli grezzi in mdf o trucciolare; non è possibile il mon-
taggio su pannelli di legno con pellicola melaminica o vetro.
3 Nel render progettuale sono presenti delle abbondanze sulle strisce, in particolare 10 cm. in altezza da suddividere in
ugual misura tra sopra e la base del rotolo, e nel primo e ultimo telo dove, a seconda della larghezza del supporto da voi
scelto per la stampa, troverete una uguale abbondanza a Sx e a Dx contrassegnate da una linea tratteggiata verticale. In
fondo ad ogni rotolo infine è stampato il codice del prodotto e il numero progressivo dei diversi teli che compongono il
disegno. Si segnala che, se non specificatamente richiesto, anche le abbondanze sono interamente stampate.
4 Procedere quindi con il rilevamento e tracciamento dell’area da rivestire con i rolli di carta da parati, con l’ausilio di una
livella, un metro e una matita, segnare i punti dove posizionare le strisce.
5 Inumidire e pulire il retro di ogni rotolo usando acqua pulita. Disporre a terra le strisce nell’ordine di applicazione, si
ricorda che possono essere usate SOLO colle in pasta, la colla consigliata da Adria Art è la Adesilex MT32 della Mapei.
La colla Adesilex MT32 NON va diluita in acqua e va stesa SOLO sul muro in modo omogeneo, utilizzando un rullo in
tessuto acrilico a pelo corto. Incollare e montare un telo alla volta.
6 Posare la prima striscia sulla parete iniziando dalla parte superiore del muro, avendo cura di lasciare la stessa abbon-
danza di circa 5 cm. sia nella parte alta che terminale del rotolo; srotolare la striscia verso il basso seguendo i segni
tracciati in precedenza con la matita sulla parete, verificare con l’ausilio della livella di aver applicato perfettamente in
verticale la prima striscia, se necessario, scostare dal muro il telo e riallineare nuovamente.
7 Aiutatevi per meglio stendere il telo sul muro con la spatola da tappezziere, avendo cura di NON rovinare il parato. Per
evitare bolle d’aria o altre imperfezioni, far aderire bene la carta alla parete utilizzando un rullo o una spugna asciutta
per esercitare pressione dall’interno verso l’esterno. Ripetere l’operazione per tutti gli altri teli. Si ricorda che i teli vanno
fissati accostati l’uno all’altro, senza sormonto, facendo attenzione che combacino tra loro perfettamente tutti i dettagli.
8 Eseguendo il montaggio come da istruzioni, avrete circa 5 cm di abbondanza sia sulla parte estrema superiore che
inferiore, ed anche una abbondanza alle due estremità laterali del primo e ultimo telo.
Rifilare con un cutter le parti di carta in eccesso aiutandovi con una riga da tappezziere o una spatola rigida. A lavoro
appena completato, prima che asciughi, pulire delicatamente la carta da parati da residui di colla, usando una spugna
appena bagnata morbida, NON abrasiva. Non utilizzare altri materiali, perché potrebbero danneggiare la carta da parati.
USEFUL TOOLS
Bucket with water - Short-haired acrylic fabric roller - Splicing roller made of plastic material
Cutter with 18 mm blade - Spirit level - Pencil - Ruler and upholsterer's spatula
Upholsterer's table - Cloth or soft sponge - Wallpaper glue
1 For best results, you will need to prepare the wall and to remove socket plates, nails or other ledges that could affect
the goods result of the work. Then fill the imperfections/holes in the wall with plaster and sand them so that the surface
is even, dry and free of any residue. The wall or plasterboard must be leveled and smooth: it is always suggested to apply
an acrylic fixative coat in order to remove some dust on the wall and to make the glue adhere better.
2 In the case of an installation on some wooden panels, use only raw Mdf or chipboard panels; it is not possible an instal-
lation on wooden panels with melamine film or glass.
3 In the design rendering there is a leeway on the strips, in particular 10cm. in height to be equally shared between the
top and the bottom of the roll as well as in the first and last strip where you will find an equal leeway on the left and
right marked by a vertical dotted line depending on the wallpaper backing width you chose. The product code and the
progressive number of the different strips are printed at each roll bottom. Please note that all leeway are fully printed,
unless specifically requested.
4 Proceed with check and tracking of the area to be covered with the wallpaper rolls by using a spirit level, a tape mea-
sure and a pencil, mark the points where the strips should be placed.
5 Dampen and clean the back of each strip using clean water. Put the strips on the floor in the order of application and
remember that ONLY paste glue can be used: the glue recommended by Adria Art is Adesilex MT32 by Mapei.
Adesilex MT32 glue should NOT be diluted in water and should be spread evenly ONLY on the wall by using a short-hai-
red acrylic fabric roller. Paste and install one strip at a time.
6 Install the first strip on the wall by starting at the top of the wall and take care to leave the same leeway of about 5cm
both at the top and at the end of the strip; unroll the strip downwards, following the marks previously traced with the
pencil on the wall, check by using the spirit level that you have applied the first strip perfectly vertically and if necessary,
move the strip away from the wall and line it up again.
7 Help yourself to better apply the strip on the wall with the wallpaper spatula by taking care NOT to damage the wal-
lpaper. In order to avoid air bubbles or other imperfections, adhere the wallpaper well to the wall using a roller or dry
sponge to apply pressure from the inside out. Repeat the operation for all the other strips. Please remember that the
strips should be fixed side by side, without overlapping them and by taking care that all details fit perfectly together.
8 By carrying out the installation as instructed, you will have approximately 5cm of leeway on both the upper and lower
ends and also another one at the two side ends of the first and last strip.
Trim the excess wallpaper with a cutter, using an upholsterer's ruler or a stiff spatula. Once the work is completed and
before it dries, clean gently the wallpaper of any glue residual with a soft and NON-abrasive wet sponge. Do not use
other materials, as they may damage the wallpaper.